Introduction:
For this observing project, you will be using the iTelescope network of robotic telescopes. You will be working in groups of about four and may share the workload for the data acquisition and data reductions in your group (i.e. to the end of measuring the differential magnitudes for all images). You will also be asked to identify which parts of the project each member of the group has carried out. However, each individual must do their own analysis and write up, and hand in their own individual reports in their own words. See Queen's academic integrity page for more information. Instructions regarding the two parts of the Phy 315 project, PART A and PART B, can be found below. Jeremy Favaro is the TA for the course and can assist with the observing project.
Research:
This year's research is focussed on the asteroid, (16) Psyche, with the goal of measuring its light curve (variation in magnitude with time). In the process, you will also be able to detect the orbital motion of the asteroid as it moves against the 'fixed' background of stars. The asteroid, (16) Psyche has a wikipedia page and each student should read this page before proceeding. Psyche is of particular interest in 2022 because of an anticipated launch date of August 1, 2022 of NASA's mission to Psyche. This mission is expected to arrive at Psyche in 2026 and to orbit and map this asteroid. Aside from the obvious interest in this asteroid from NASA, this asteroid was chosen for the Phy 315 project because a) it reaches opposition on March 3, 2022, b) it has a magnitude (roughly 10th -11th magnitude) that is accessible to the iTelescope telescopes in reasonable integration times, and c) its rotation period is known to be about 4.2 hours. The short rotation period is particularly important because it means that each student group should be able to measure its entire period in a single observing session.
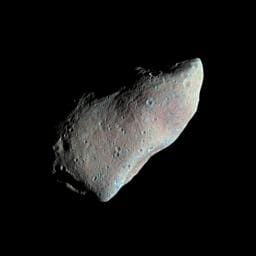
What students will actually measure is the asteroid's light curve, which is a measure of a change in magnitude with time. Why does the light from an asteroid vary with time? There are a number of possible reasons for this: a) the distance to the asteroid from the earth is changing with time as each follows its own orbit around the sun, b) the phase angle (the angle, as seen from the asteroid, between the Sun and the Earth) changes with time so the amount of illumination of the asteroid as seen from the Earth varies, and c) the asteroid rotates. The first two are slow variations with time for main belt asteroids. On short time periods (say, less than a day) it is the latter reason that dominates and this is what we want to try to measure if possible. Rotation can change the magnitude either because of variations in albedo (reflectivity) on the asteroid's surface or because the surface area that is presented to us changes with rotation. For a non-spherical asteroid (most of them), the latter dominates. In fact, most asteroids are more like 'potatoes' than 'balls', as the following picture of the asteroid, Gaspra, illustrates. For (16) Psyche, as indicated above, the rotation period is known, but rotation periods can also evolve with time, so finding a period that differs somewhat from the `known' value is certainly possible.
What students will actually measure is the asteroid's light curve, which is a measure of a change in magnitude with time. Why does the light from an asteroid vary with time? There are a number of possible reasons for this: a) the distance to the asteroid from the earth is changing with time as each follows its own orbit around the sun, b) the phase angle (the angle, as seen from the asteroid, between the Sun and the Earth) changes with time so the amount of illumination of the asteroid as seen from the Earth varies, and c) the asteroid rotates. The first two are slow variations with time for main belt asteroids. On short time periods (say, less than a day) it is the latter reason that dominates and this is what we want to try to measure if possible. Rotation can change the magnitude either because of variations in albedo (reflectivity) on the asteroid's surface or because the surface area that is presented to us changes with rotation. For a non-spherical asteroid (most of them), the latter dominates. In fact, most asteroids are more like 'potatoes' than 'balls', as the following picture of the asteroid, Gaspra, illustrates. For (16) Psyche, as indicated above, the rotation period is known, but rotation periods can also evolve with time, so finding a period that differs somewhat from the `known' value is certainly possible.
Specific Goals:
The goals are a) to familiarize the students with modern techniques in astronomical observations and the care and commitment required to obtain good data, b) to identify an asteroid in a field of stars and detect its orbital motion, c) to understand what steps are required for data calibration, d) to measure the light curve by differential photometry in the V filter, and e) to estimate the errors in each of the above processes, indicating which are the largest source(s) of error.
PART A: Observe the Asteroid
(Observing period ends, Friday, Feb. 11, 2022)
Planetarium Software:
[Optional] If you do not already have planetarium software on your computer, the first step is to download and install this aid. Stellarium is free software which has linux, mac, and windows versions. Spend a little time exploring this system. It will help you to see the location in the sky of the asteroid (or any other object), whether it is rising or setting, how high it is in the sky, whether it is too close to the moon to be easily observed, etc. It is possible to do this project without planetarium software, but it helps with an understanding of the project and may also be useful to you in the future.
The iTelescope Network:
The iTelescope network is an international network of amateur telescopes that are available to the public 'for hire'. Once you have your group established, contact the TA to obtain a username and login. From the home page, click on iTelescope Video Tutorials. Try going through the Launchpad Series to become familiar with the site.
There are telescopes in Australia, Spain, New Mexico and California; Since asteroid (419) Aurelia is about 11th magnitude, I recommend a medium-deep or a deep space telescope. This means that the telescope has a sufficiently large aperture that it can image faint objects in reasonable integration times (say one minute). Look at the choice of telescopes at the Observatory Data page. Make a note as to which telescopes fall into the medium-deep or deep category. Try logging in and exploring the site. Click on one of the telescopes (you will have to log in again) and check to see what reservations have already been made by others. Ideally, you will want 4 hours of consecutive time (this is the maximum allowed by the iTelescope network) in order to do your observations. The challenge may be to find 4 hours of consecutive time that is not being used by someone else. If 4 hours is not available, get what you can -- even 2 hours will provide useful data. No one is allowed to book more than 4 days in advance, so you might need to keep your eye on several telescopes until you can see open slots.
The spectra of asteroids tend to peak around 0.65 to 0.70 microns (Bus et al. 2002), which corresponds to R-band (Table 3.1, text), i.e. the asteroid will be brightest at R-band. However, many catalogs of stars for comparison are given in V-band and, since the asteroid should still be bright in V-band, we will use V-band for our observations.
Choose a telescope that has available time. From the Observatory Data page, make a note of: its coordinates (longitude, latitude), the telescope's code (e.g. for telescope, T5, the code is H06, case sensitive!), the number of hours that separate the observatory from UTC (Coordinate Universal Time, e.g. for T5, the observatory is in Mountain Standard Time so is at UTC - 7 hours as the page indicates), the minimum target elevation, and the CCD's resolution and array size (arcsec/pixel and number of pixels, respectively). Note, it is important to include the observatory code -- otherwise you will not get the information that you need about the Sun and Moon positions to compare them to your target.
The Minor Planet Center (MPC) Ephemeris Service:
Now you need to know where the asteroid is in the sky. This is simple by using the Minor Planet Center (MPC) Ephemeris Service. Enter the name or number of the asteroid, the start date for your observations and the number of output rows ('Number of dates to output' = 24), specify hours for the increment, enter the observatory code (e.g. H06 for New Mexico) and click on 'Get ephemerides/HTML page'. The output will indicate the Right Ascension (RA) and Declination (DEC) of the asteroid, its azimuth and altitude for the specifed times, and other useful information.
N.B. Be careful! The MPC gives values in UTC whereas the iTelescope network telescope times are all local times at the telescope. Make sure you get the day right too, since, for example, UTC=04:00:00 on Jan. 15 => MST=21:00:00 on Jan. 14. Now check that the altitude of the asteroid is above the telescope's minimum target elevation for the entire observing time that you have specified. If not, you'll have to adjust the time period that you are requesting. You want the altitude of the asteroid to be high enough to observe at the same time as the Sun is below the horizon (altitude of Sun is negative). Circle the time period over which the asteroid will be high enough in the sky to observe and check whether there is a slot at the telescope that is open over that period. You might have to iterate.
N.B. Be careful! The MPC gives values in UTC whereas the iTelescope network telescope times are all local times at the telescope. Make sure you get the day right too, since, for example, UTC=04:00:00 on Jan. 15 => MST=21:00:00 on Jan. 14. Now check that the altitude of the asteroid is above the telescope's minimum target elevation for the entire observing time that you have specified. If not, you'll have to adjust the time period that you are requesting. You want the altitude of the asteroid to be high enough to observe at the same time as the Sun is below the horizon (altitude of Sun is negative). Circle the time period over which the asteroid will be high enough in the sky to observe and check whether there is a slot at the telescope that is open over that period. You might have to iterate.
Back to Stellarium:
[Optional] Although the MPC provides the information that you need, including the Moon phase and location as output, it is still useful to look at where your asteroid is in a planetarium program. In Stellarium you can set the location of the observatory as well as the observatory's time. Then search on the asteroid position. Is the asteroid rising, setting, close to the moon, etc.? Advance the time by 4 hours to ensure that everything looks good for the entire observation.
Generate the Observing Plan:
Once you are satisfied that the times, dates, and chosen telescope will be acceptable, you need to set up the observations. Log in to the telescope that you've chosen (if you haven't already) and make a reservation for the time period that you want (see next section) and click on Deep Sky (left panel). Choose the V filter and set the RA and DEC of the asteroid for the center of the observation time period. (You can check how much the asteroid will move over the course of 4 hours from the ephemeris output and verify for yourself that it will still be well-placed on the CCD at both the beginning and end of the observations. The Minor Planet Center ephemeris output tells you how many arcsec/min the asteroid moves.
Now you need to specify an integration time (which is in seconds). If the time is too short, then you won't easily see the asteroid on any given frame and the signal-to-noise ratio will be low, meaning that the random noise on any given image will be high. If the time is too long, then the detected counts will reach the saturation value value (65535 counts); an object that has reached this value cannot be used for any magnitude measurements. For example, I used telescope T21. For this telescope, I used Durations (60 s) in which case the first row under Use, would have a Count of 240 and Filter set to V (240 frames of 1 minutes each = 4 hours) with Binning at 1 (no binning).
Now you need to specify an integration time (which is in seconds). If the time is too short, then you won't easily see the asteroid on any given frame and the signal-to-noise ratio will be low, meaning that the random noise on any given image will be high. If the time is too long, then the detected counts will reach the saturation value value (65535 counts); an object that has reached this value cannot be used for any magnitude measurements. For example, I used telescope T21. For this telescope, I used Durations (60 s) in which case the first row under Use, would have a Count of 240 and Filter set to V (240 frames of 1 minutes each = 4 hours) with Binning at 1 (no binning).
Make a Reservation and Carry out the Observations:
Can can follow the instructions from the video to reserve time on the telescope and link that time to the observing plan that you've just set up. In brief, to set up the reservation, click on Make a Reservation in the left column, which gets you into a mode in which you can edit the schedule. Click and hold (left mouse button) the time range that you want. Don't worry if it isn't exact yet because you can change this later. As soon as you let go of the mouse, a window will launch in which you can enter the correct start and stop times and access the plan that you have previously generated. The reservation will then show up on the schedule. Your observing plan is associated with the telescope that you have chosen. If you change telescopes in a later trial, then you need to make the plan again for the new telescope.
It is recommended that you watch as the observing takes place and this can be quite interesting and engaging, although it isn't entirely necessary if you've been careful. If something does go wrong, however, watching the observations in real time would allow you to stop the observations if necessary and/or resubmit a new observing plan before others take up all the time. Once the data have been obtained, you will be sent an email showing you raw jpeg images and providing information on the weather and success (or not) of the observing session.
It is recommended that you watch as the observing takes place and this can be quite interesting and engaging, although it isn't entirely necessary if you've been careful. If something does go wrong, however, watching the observations in real time would allow you to stop the observations if necessary and/or resubmit a new observing plan before others take up all the time. Once the data have been obtained, you will be sent an email showing you raw jpeg images and providing information on the weather and success (or not) of the observing session.
Download the Data:
To download data, log in to the ftp server. Try zipping all of the files and downloading a single zipped file. The download will include the raw images as well as calibrated images. Filenames of calibrated images will start with the prefix, "calibrated" and you may start your data reduction with those images. This means that the images have been oriented with north to the top and east to the left, and have already been corrected with bias frames, dark frames,
and flat field frames. Make sure that you understand what each of these steps have already done. The images (once unzipped) are in fits format which is the standard format for astronomical images. A list of software that can read fits images can be found here. Any of these that you could access would be useful for a quick look at the data. For our data reduction, however, we will be using IRIS because it has the needed software and is `student-friendly', i.e. it is windows-based and free of charge
and flat field frames. Make sure that you understand what each of these steps have already done. The images (once unzipped) are in fits format which is the standard format for astronomical images. A list of software that can read fits images can be found here. Any of these that you could access would be useful for a quick look at the data. For our data reduction, however, we will be using IRIS because it has the needed software and is `student-friendly', i.e. it is windows-based and free of charge
Find the Asteroid:
It is sometimes difficult to identify the asteroid on an image. One way to do this is simply to look from frame to frame and check for an object that is moving with time (with respect to the other stars) in the direction specified by the MPC output. Recall that your first frame should have the asteroid centered on the CCD. Do not confuse a moving object with cosmic ray hits which are random in position and time. Another way is to make a finder chart with the same dimensions as the CCD and centered at the location specified for the observations. Here is the Swarthmore link and here is the IRSA link, either of which will make a finder chart for you and which you can compare to your image. However, if you have set up the observations correctly, then the asteroid should be right in the middle of the frame and the fact that it will move in position, frame-to-frame, should help you identify it.
Submit a Progress Report: (Due Thursday, February 17, 2022)
The progress report should contain one image with the asteroid marked as well as a table indicating data relevant to your observations, e.g. which telescope was used, what date(s)/time(s) that observations were carried out or other any other pertinent information such as CCD parameters, weather, etc. The progress report should be no more than 2 pages. By this date, you will be confident that you can find your asteroid on the images.
Observing is taken very seriously by astronomers. Without time and attention paid to careful data collection, we would know nothing about
the universe we live in.
Observing is taken very seriously by astronomers. Without time and attention paid to careful data collection, we would know nothing about
the universe we live in.
Part B: Reduce and Analyze the Data (Due Thursday, Mar. 31, 2022)
This part of the project requires that you make measurements from the images. The free software, IRIS, can be used for the measurements. Differential photometry is the process of measuring the difference between the magnitude of a target by comparison with the magnitudes of a number of comparison stars. The comparison stars are assumed to be of fixed (not varying) magnitude. The counts, however, from the comparison stars will vary from frame to frame because the atmosphere changes as the sources are tracked to different elevations in the sky. Tasks are available in IRIS to help you determine the changing magnitude of the asteroid in comparison to the fixed magnitudes of the comparison stars.
The TA for the course will provide a tutorial as to how to carry out the data reductions and determine the light curve of the asteroid. Further information will be provided at a later date as to what is expected in the final report. However, once all data have been measured and the final light curve obtained for each group, a way to determine the period is to do a time-series analysis. One option is to use:
irsa.ipac.caltech.edu
Click on 'Tools', and then 'Time Series Tool'. For `Choose Mission' pick 'Other' and upload the file. The table will then be shown at left and a plot of the data on the right. The plot may look random because the period/phase has not yet been found for the asteroid. Click on `Period Finder'. At this point, you can enter periods manually or use the slider to adjust to a period. You are looking for a value that makes the plot look most like a light curve and least random. Clicking on `Calculate Periodogram' will do the search for you and will return with frequencies that best represent the data. Download your final light curve and periodogram for your write-up.